How To Register A Domain Name With Namecheap.
Area search course of
If you search for a website utilizing our Start your domain search here, you’ll discover the knowledge concerning its availability with an inventory of comparable domains you might be thinking about. Our Beast Mode instrument permits to examine choices for quite a lot of names and set varied filters: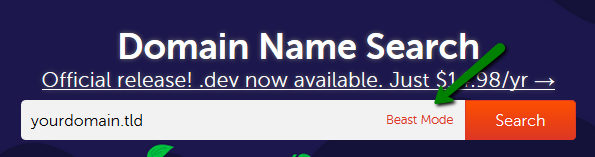
You may enter fully-qualified domains (High-Degree Domains or TLDs like .com, .internet, and many others.) or choose TLDs from the record: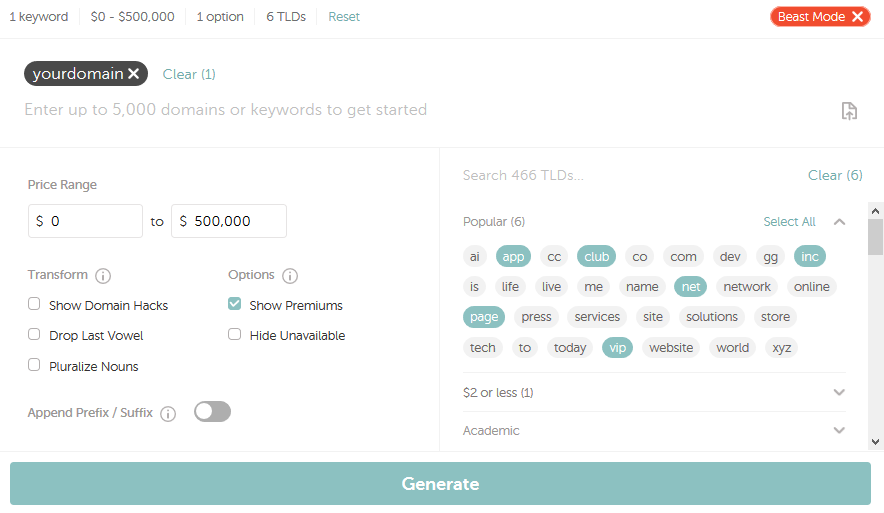
PLEASE NOTE: It’s potential to register as many as 50 domains at a time.
You may take benefits of various obtainable choices of our Beast Mode, particularly:
- Select the needed Worth Vary
- Use Present Area Hacks choice. Area hacks are domains that mix area ranges to spell out the total title or identify of the area identify. These sort of domains spells out a phrase through the use of a mixture of intervals and fewer in-style country-based extensions. Area hacks provide the flexibility to supply very quick domains (e.g., inter. internet, area. identify)
- Conceal Unavailable domains
- Present Premiums signifies whether or not you wish to see premium domains within the output or not
- Drop Final Vowel removes the final vowel within the search outcomes (e.g., the ocean. identify will probably be proven as identity)
- Pluralize Nouns creates a plural type of a noun (e.g, house. internet will probably be proven as areas. internet)
- Append Prefix/Suffix contains outcomes that add textual content to the start or the tip of your key phrases
For instance, let’s assume that you simply want to register yourdomain.com. You go to Domain Name Search, enter yourdomain.com to the Search subject, and click on Search.
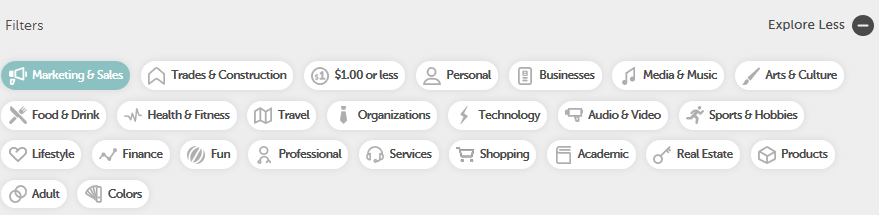
On the subsequent web page you will notice the Discover extra button, which lets you filter the outcomes by the next choices: Skilled, $1 or much less, Private, and different classes:
There are a number of totally different statuses {that a} area can have:
- V (or clean): The area identify is on the market for registration. You will notice the Add to Cart button subsequent to these kinds of domains.
- Particular: The area identify is on the market and could also be registered at a promotional value at that exact second.
- Taken: The area identify is both registered by another person or reserved by the Registry. You might also see the Make Supply button subsequent to those specific domains. By clicking on it, you enable our companions – DomainAgents – to enter into negotiations on your behalf to buy the area identity for you.
- Premium: The label both signifies it’s a premium area identify that’s bought by its present proprietor, or a high-valued premium area identify that’s already launched for registration and/or at the moment reserved by the Registry. Some premium domains will be paid month-to-month with the particular Finance choice, with the corresponding button subsequent to them:
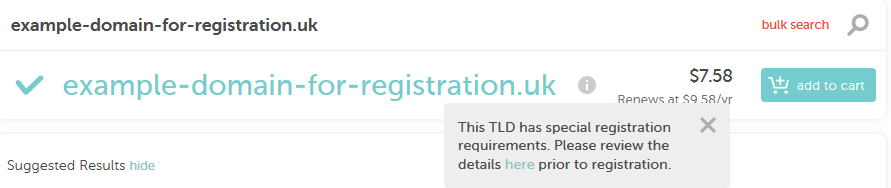
Please take into account that some domains have particular necessities or want further particulars offered upon registration. In these situations, you will notice the “i” icon subsequent to them:
PLEASE NOTE: Namecheap helps IDN domain registrations as nicely. An IDN will be registered with the symbols of 1 language solely. It’s required to pick the language in the course of the area registration course. You will discover the total record of supported TLDs and languages within the related article.
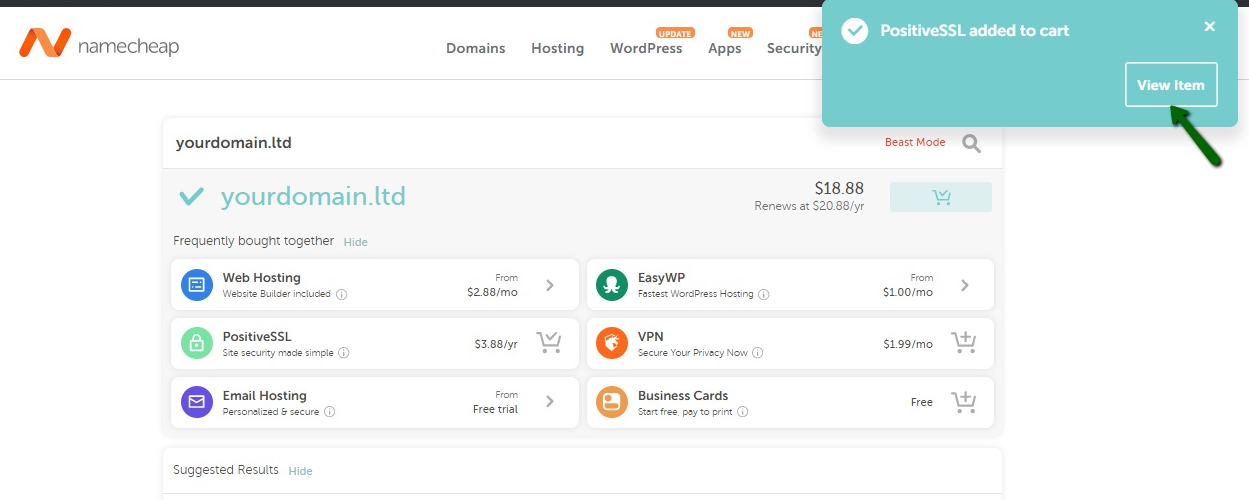
If you add a website identify to your Procuring Cart, you’ll obtain the next choices to pick from: add an Internet Internet hosting bundle, add 1-year PositiveSSL certificates, add a 2-month trial E-mail Internet hosting, add an EasyWP subscription, add a 1-month VPN subscription, add an Enterprise Playing cards utility:
Click on on the “+ Cart” icon or “>” button to pick the extra merchandise you’d like. As soon as all the required merchandise are in your Procuring Cart, click on on the View gadgets button on the pop-up window, which can seem in the correct higher nook:
Overview the gadgets added to your Procuring Cart,and click on on the Checkout button to proceed additional.
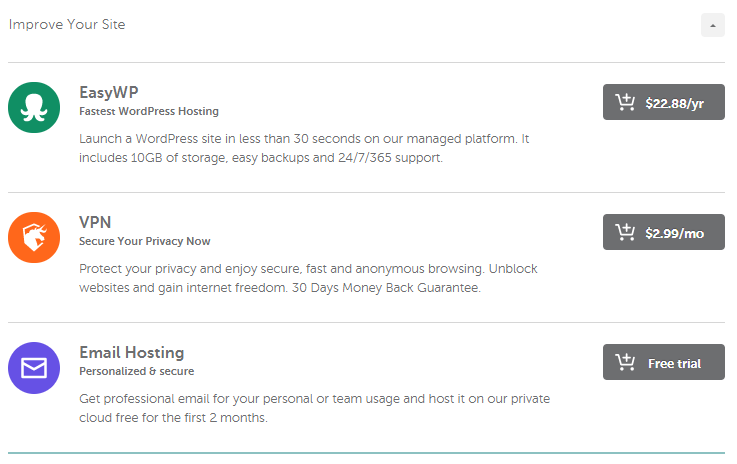
Right here you’ll be able to add the quantity of years for particular merchandise and/or change their billing cycle. You may as well examine the Enhance Your Web site part that permits you to add an EasyWP internet hosting bundle, a 1-month VPN subscription or a free trial E-mail Internet hosting plan:
Click on the Toggle button to allow or disable the auto-renewal choice in addition to different companies like WhoisGuard and PremiumDNS. The Save for Later icon saves any merchandise and the “x” button removes the pointless one.
As soon as you’re able to order the merchandise, click on on the Verify Order button to proceed with the checkout:
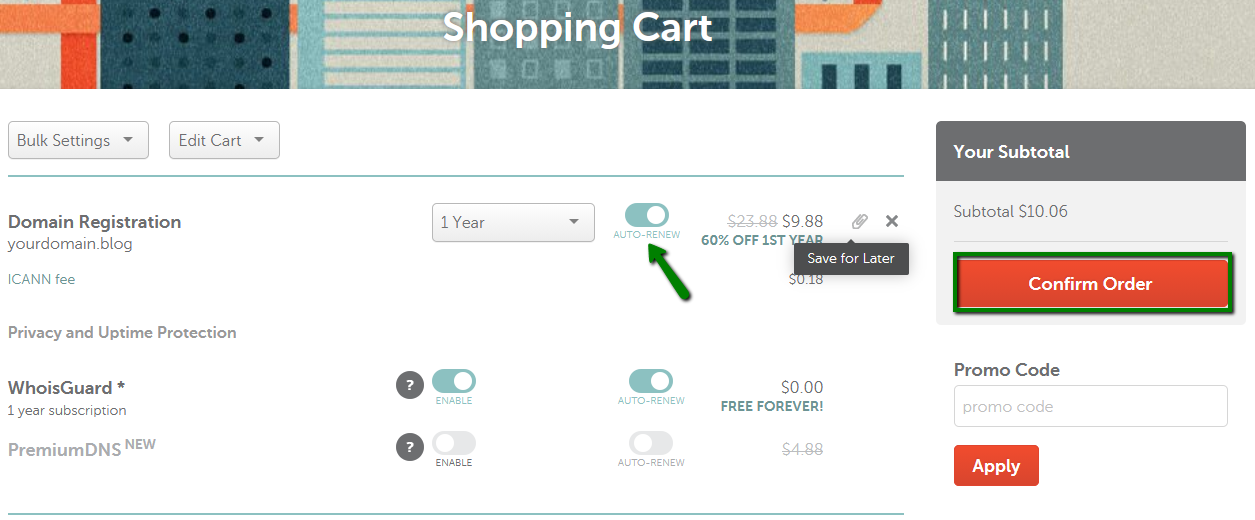
PLEASE NOTE: The “pinned” gadgets will probably be added to the Saved For Later menu in your Procuring Cart: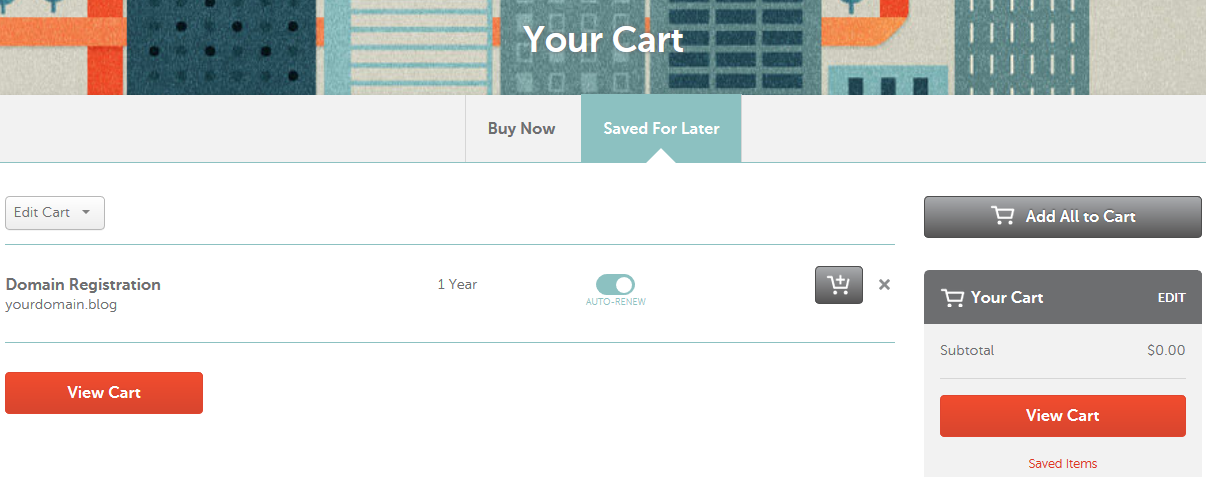
Area configuration
In case you are not logged in, you may be prompted to enter your Namecheap account username and password on the subsequent web page. In case you don’t have a Namecheap account, it is possible for you to create one on an identical web page.
In case you register a website identify for the primary time, and you haven’t offered your contact data (the postal handle, telephone, and many others.), you may be prompted to do it earlier than continuing to the Billing stage. To do that, click on on the I’m registering on behalf of an organization choice to fill in your respective Firm Title and Job Title:
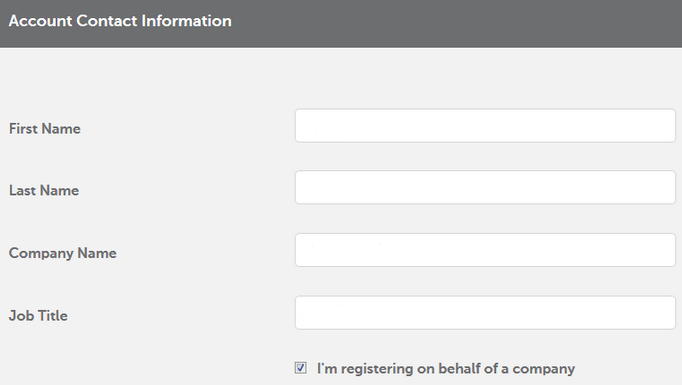
PLEASE NOTE: By default, these contact particulars you present will probably be used for all future orders.
If some Prolonged Attributes for domains with particular necessities are to be offered, you may be redirected to the Setup web page. Right here you’ll be able to configure the Whois contact data, WhoisGuard privateness safety and nameserver settings for every area identify, individually:
Fee settings
If the Whois contact data must be offered without the Prolonged Attributes for quite a lot of domains, you may be urged to vary the settings for all domains in a batch, though it’s potential to set them up individually:

It is possible for you to to modify again to batch setup at any second:
Nearly all the domains have to have the Registrant, Administrative, Technical, and Billing contacts, whereas different can have the Registrant and Administrative contacts (.CA domains) and even the Registrant contact solely (.EU and . UK domains).
You could select to Use default account contact, Add new contact or Use beforehand saved contact. For brand new and beforehand saved contacts, there will probably be a choice to edit and save them in your Namecheap account: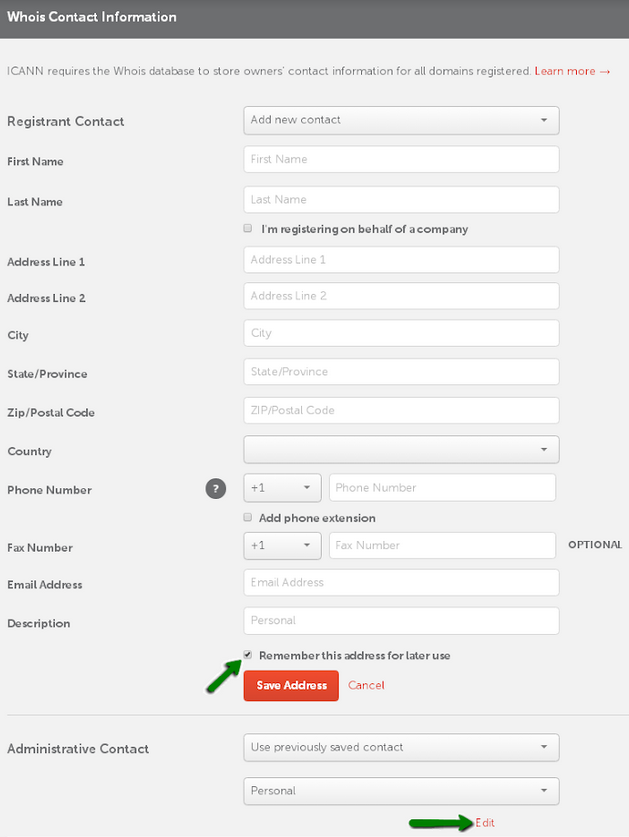
By default, WhoisGuard Privateness Safety is enabled for the supported TLDs at the time of buy. Nonetheless, it’s potential to disable it within the corresponding part:
PLEASE NOTE: As a result of restrictions of sure Registries, WhoisGuard can’t be used with a particular variety of domains. You could examine further data on the WhoisGuard page.
To alter nameservers, you’ll be able to click on the Present Further Settings hyperlink. After the setup is full, click on on the Proceed button to proceed: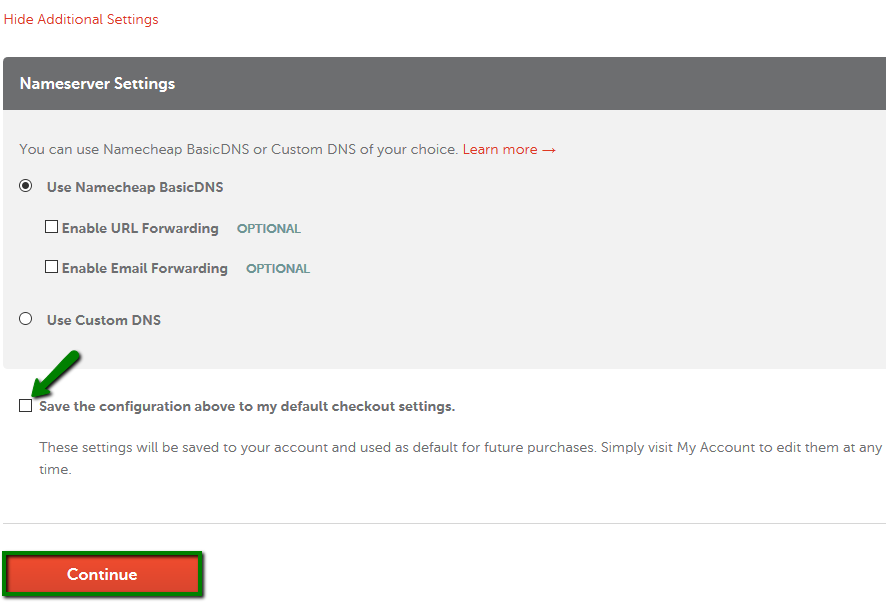
PLEASE NOTE: You could skip this step, with the settings saved, in the course of the earlier order or specified on the Domain Contacts Presets and DNS and Redirect Presets menus prematurely.
If the Whois and DNS settings are tremendous, and it’s the primary time you pay for the order, you should specify the payment method. On the Billing stage, you might select between a Safe Card Fee, PayPal, or Account Funds.
Safe Card Funds will be made with Visa, MasterCard, American Specific, and Uncover. You should utilize a saved card, or add and save a brand new one, offering the cardboard holders identify, the 16 digits of the bank card quantity, the 4 digits of its expiration date (MM/YY), the three digits of the CVC code and the cardboard’s billing handle:
PLEASE NOTE: Not like safe card funds, PayPal account particulars can’t be saved and should be offered every time you place an order.
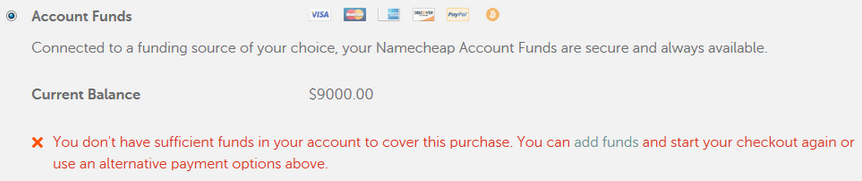
As for the Account funds choice, it may be used when the steadiness covers the whole sum of the order. Funds change into obtainable after deposits from bank cards, PayPal or Bitcoin.
If the steadiness is inadequate, you’ll obtain the next message:
Beneath it’s also possible to evaluate the auto-renewal settings, the billing contact data associated with the order, and save them as default for all future orders. After the setup is full, click on on the Proceed button to proceed:
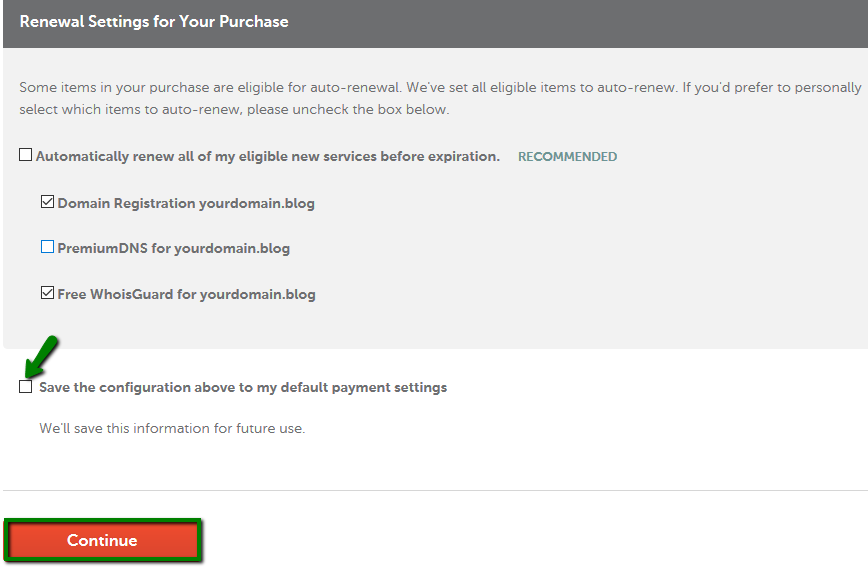
PLEASE NOTE You could skip this step if in case you have the fee data saved within the earlier order or specified within the Profile >> Billing >> Fee part. You might also add a credit card or funds to your account prematurely.
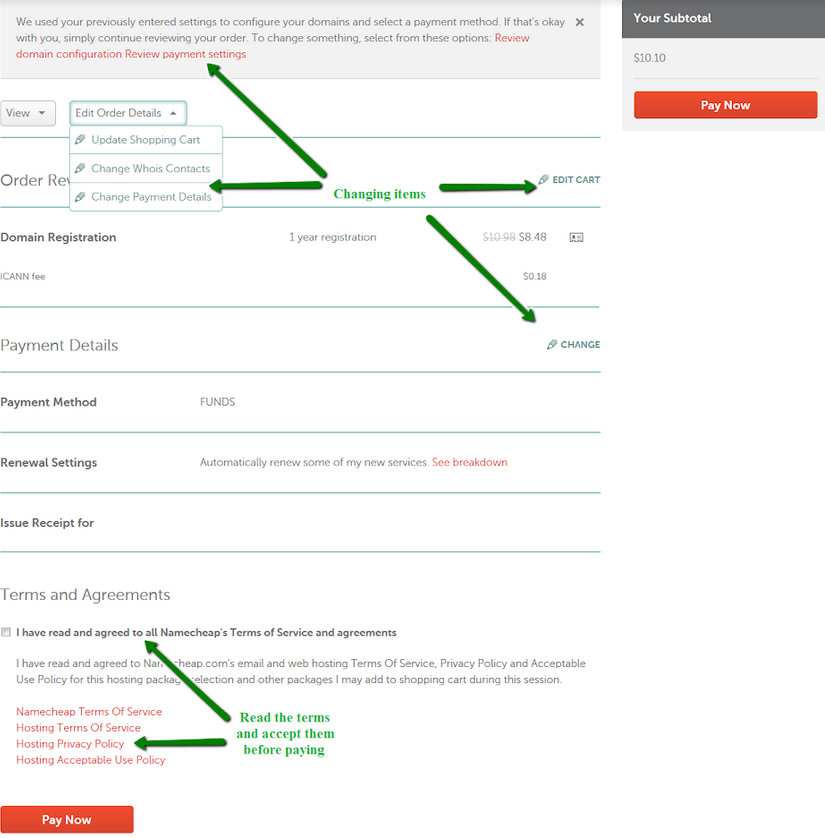
On the subsequent web page, it is possible for you to evaluate your order as soon as once more, examine the phrases of service, and pay for the merchandise.
If you should change your settings or fee particulars, click on on the Overview area configuration or Overview fee settings hyperlinks situated on the prime of the web page.
When you’re prepared to put your order, click on on the Pay Now button (Checkout with PayPal if PayPal was chosen as a fee technique):
The chosen gadgets are processed one after the other, and when your order is full, the order abstract will probably be printed on the display screen in addition to despatched to your main e-mail handle.
You could examine it, resend or obtain it as a PDF file within the Order History section.
That’s it!